Typehub #
Typehub plugin is used to control the typography of various elements across the site. Navigate to the Typehub screen on your wordpress dashboard to modify the Font settings. In this article we will explain each aspect of the plugin and how you can effectively use them for building your website.
Font Values – #
This is the main tab in which you have to change the font values of different elements in the site. Click on the “?” icon beside the Label in the “Font Values” screen to see a preview of the corresponding setting.

Font Schemes – #

With Typehub font schemes you can set a particular scehem active and inactive. When you set a font scheme active it is made available to use in tatsu.
Responsive Breakpoints – #
Desktops – Screen size > 1377px.
Laptops – Screen size between 1024px – 1377px
Tablets – Screen size 768px – 1024px
Mobile – Screen size < 768px.
Uploading a custom Font – #
In Typehub 2.0, we have added provision in the plugin to upload custom fonts. Follow the simple steps below to generate and upload your custom fonts.
- Go to the Custom Fonts tab in the TypeHub Plugin
- Upload your font’s source OTF / TTF file to generate the webfont kit and click on Generate.
- Generate web font and download the package
- Go to the Custom Fonts tab inside Typehub and upload the webfont package.
- That’s it, you can now use your custom font for any of the font options.
Adding a custom Font programatically using APIs – #
To add a custom font, simply register the font using the “typehub_register_font” hook. A sample code that you can add to the functions.php file of your child theme, is shown below.
add_action( 'typehub_register_font', 'my_typehub_custom_font' );
function my_typehub_custom_font() {
$font = array(
'name' => 'CUSTOM FONT NAME',
'src' => get_stylesheet_directory_uri().'/fonts/fonts.css',  // URL of your font's stylesheet. Assuming its inside the fonts folder of your child or main theme
'variants' => array(
'300' => 'Light',
'400' => 'Normal',
'500' => 'Medium',
'700' => 'Heavy'
)
);
typehub_register_font( $font );
}
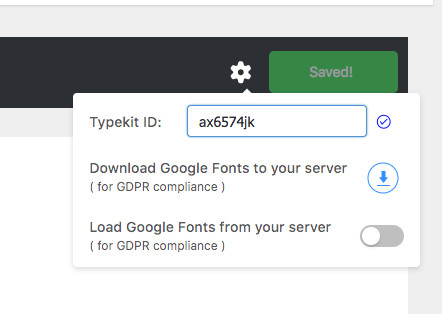
Typehub Global Settings – #
Use the settings Icon in the Top Right corner to add your Type Kit Id and Save the settings. You will then be able to use your Type Kit Fonts. Use the settings Icon in the Top Right corner to download the google fonts that are used to your local server. Any new fonts added / changed can be downloaded once you have SAVED the typehub Settings.