- Note
- Alternate Manual Import Process – ( must for Oshine v5.0.5 and below, but works with v5.1 and above as well )
Before importing the demo content ensure that you have Installed and Activated all the mandatory plugins. Please follow all the steps in this page completely, to import the sample data on to your site and have it look it the demo.
Note #
- Ensure all required and recommended plugins are installed & activated prior to importing the samples.
- Ensure your server PHP configurations ( memory_limit & max_execution_time ) are updated to the values recommended in the panel. The max_execution_time configuration requirement is mainly for importing the demo data and can be reset to server default after the process is completed as its not required for the actual working of the theme. You can contact your hosting provider in order to configure / update these settings.
- If you are importing the demo for the first time, simply choose all the options, choose a demo of your choice and import it. Your site will look exactly like the demo.
- If you have already imported a demo / configured or customised your options panel, please note that importing the options panel data will overwrite your existing settings in OSHINE OPTIONS. So it is advised that you backup your Options by going to OSHINE OPTIONS -> IMPORT / EXPORT tab or choose not the import the options a second time.
- The images in the actual demo will be replaced with blurred images in the sample data. This is to speed up the import process as well as licensing reasons.
- Importing demo data will not remove any of your existing pages. It will set the main menu from the demo and you can go to APPERANCES -> MENUS to modify it or create your own.
- All the Shop related samples, including sample products are included separately in the SHOP SAMPLES demo. Use this sample content if you are setting up a shop. Please Ensure WOOCOMMERCE plugin ( free plugin available in the wordpress respository ) is installed & activated prior to importing the shop samples.
- If you have any issues during the import process, please copy the import log and contact our support team using this link. If the demo got imported properly, you can ignore the import log as its for reference purpose alone.
Alternate Manual Import Process – ( must for Oshine v5.0.5 and below, but works with v5.1 and above as well ) #
The importing of the sample content is divided into the following 4 parts. Each of the steps below have to be completed to get the Site to look exactly like the demo. The details about each of these steps are given in this article sequentially.
- Import Pages, Posts, Portfolio and Settings
- Import Sample Sliders – Master Slider or Slider Revolution
- Set up Main Navigation Menu
- Set up Home and Blog Pages
Import Settings, Pages, Posts and Portfolios : #
THE STEPS BELOW EXPLAIN HOW TO IMPORT THE SAMPLE CONTENT USING THE BE ONE CLICK IMPORT PLUGIN. #
1
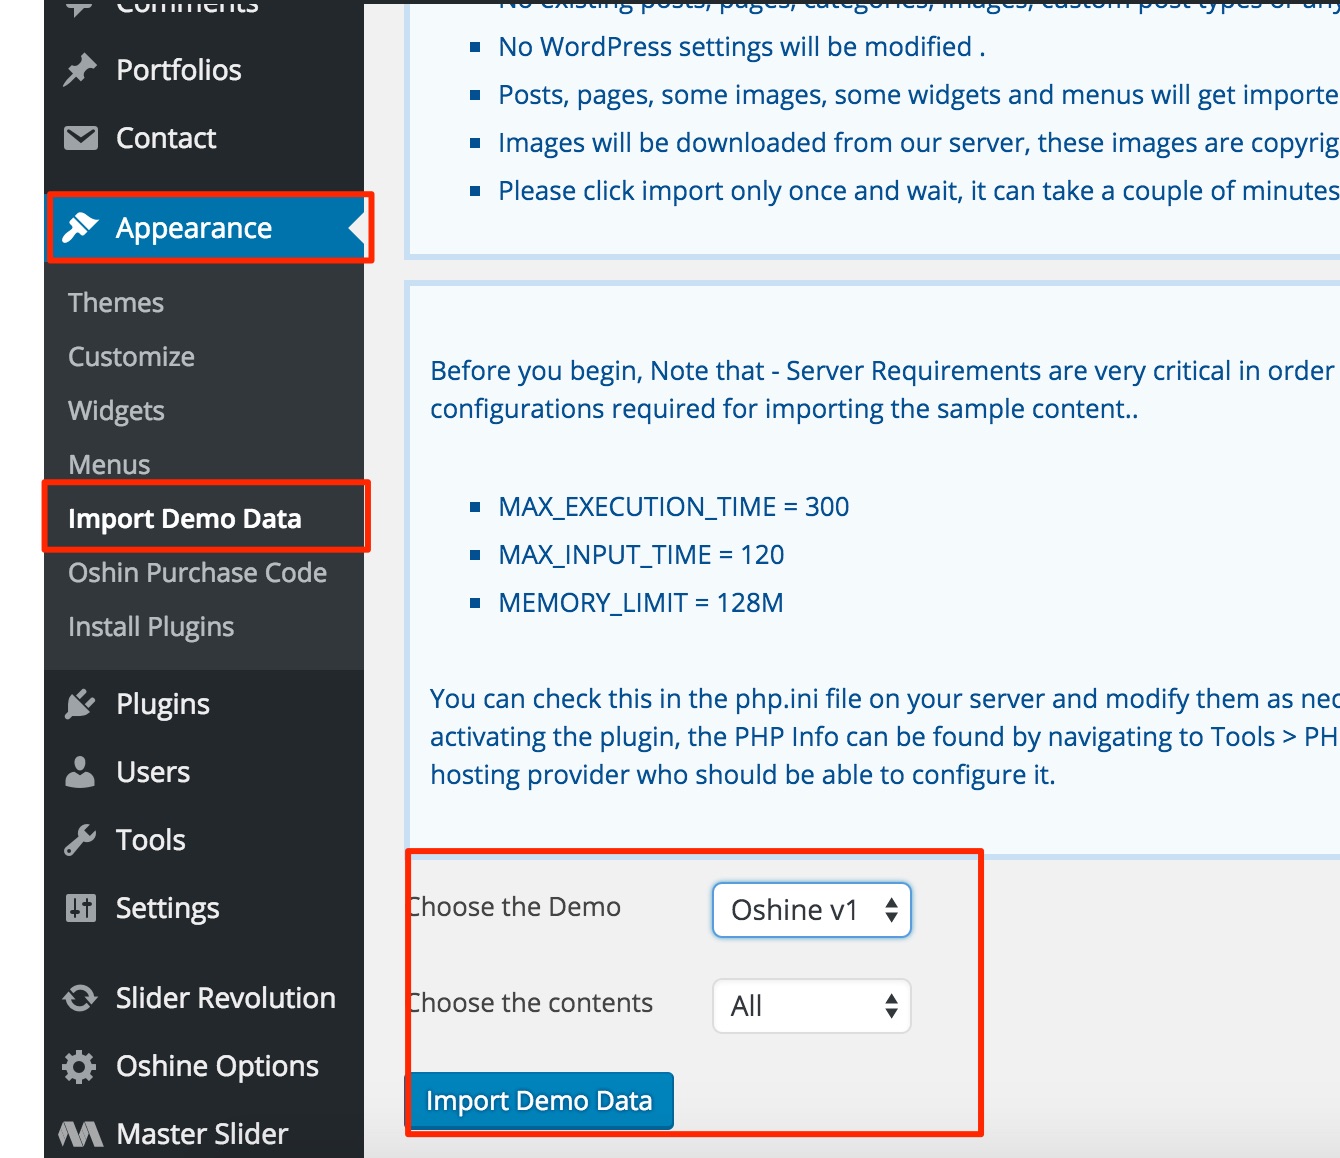
Import Demo Content – Navigate to APPEARANCES > IMPORT DEMO DATA, and from the list Import the democontent of your choice. Choose the demo from the drop down and click on Import. As mentioned earlier, kindly the ensure that your Server configurations are set up as per the requirements .

By choosing “All” from the dropdown of the “Choose your Content” setting, the unique pages that belong to that demo will be imported along with its Options Panel settings and Widgets. You can also choose to import just the content (pages, posts, images & menus) , options or widgets individually as well.
NOTE: Please note that by choosing ALL or just the OPTIONS, all the settings in the OSHINE OPTIONS PANEL will be overwritten. So incase you are importing data from multiple demos, ensure you just choose “CONTENT” and then when you are finally done import just the pages from different demos, Import the “OPTIONS PANEL SETTINGS” of a particular demo of your choice. All the demos were created using the various settings available in the options panel & the page builder. So you can mix and match layouts and features from various demos by modifying the settings in Options panel accordingly.
You are just a couple steps away from setting the site just like demo. You now have to Save the Menu and Setup Home and Blog Pages. Incase you face some issues while importing the demo, don’t worry, the common issues and the solutions are explained below.
Common Issues while Importing Demo Content #
1. 500 INTERNAL SERVER ERROR WITH BLANK PAGE – #
This will occur when your server configuration does not meet the minimum requirements set forth in the Server Requirements article. Please edit your php.ini file and modify the configurations to match the requirements. If you are not familiar performing this, you can reach out to your server hosting provider and they would be able to configure this for you.
2. 404 PAGE NOT FOUND #
You need to increase the Max Execution Time a bit more than what is mentioned above. Increase the limit to 1000ms- max_execution_time = 1000 and also ensure the other configurations mentioned below are set as recommended. Try Importing the data again. If you still get the 400 Page Not Found error, you have to follow the steps below(Alternate Method to Import Content) to import the content manually.
Import Master Slider Samples : #
We have used MasterSlider plugin to create the Home page sliders in many of the demos. The steps below explain how to import the Master Slider. Before importing the slider, you have to ensure that the Plugin is installed and Activated.
1
Upon activating the master slider plugin you will notice a new tab named ‘Master Slider’ on the left hand side panel. Click on the tab to open its panel.
2
Click on ‘Import & Export’ button at the bottom of the screen.

3
Click on Choose File and choose the .json file. You can find the file from the theme package under SAMPLE CONTENT -> SLIDER CONTENT -> MASTER SLIDER, choose the .json file of the demo that you have just imported. Click on Import

You will get a confirmation that the import was successful. Click on ‘Back to Panel’ to go back to the panel and follow the steps above to import the other slider samples (.josn file) of your choice.
Import Slider Revolution Samples : #
We also have used Slider Revolution in few other demos. The steps below explain how to import the slider samples into your site. Before importing the revolution slider ensure that the Revolution Slider plugin is installed and activated.
1
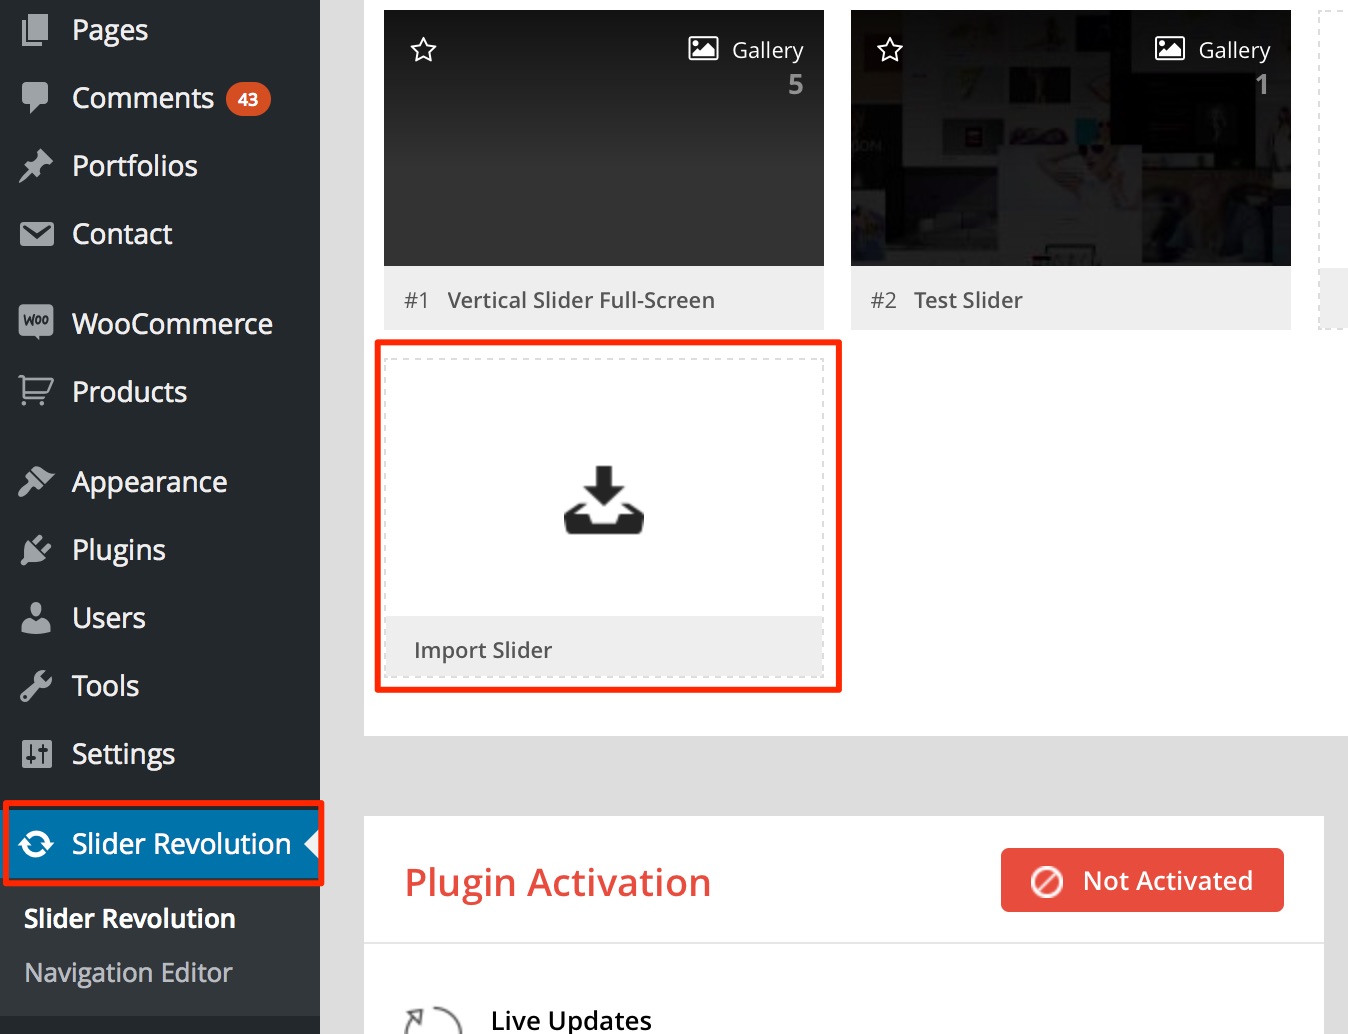
Upon activating the Revolution Slider plugin, you will see a new tab named Revolution Slider on the left hand side panel. Click to open it.
2
Click on Import Slider, you will see a prompt to choose the slider.

3
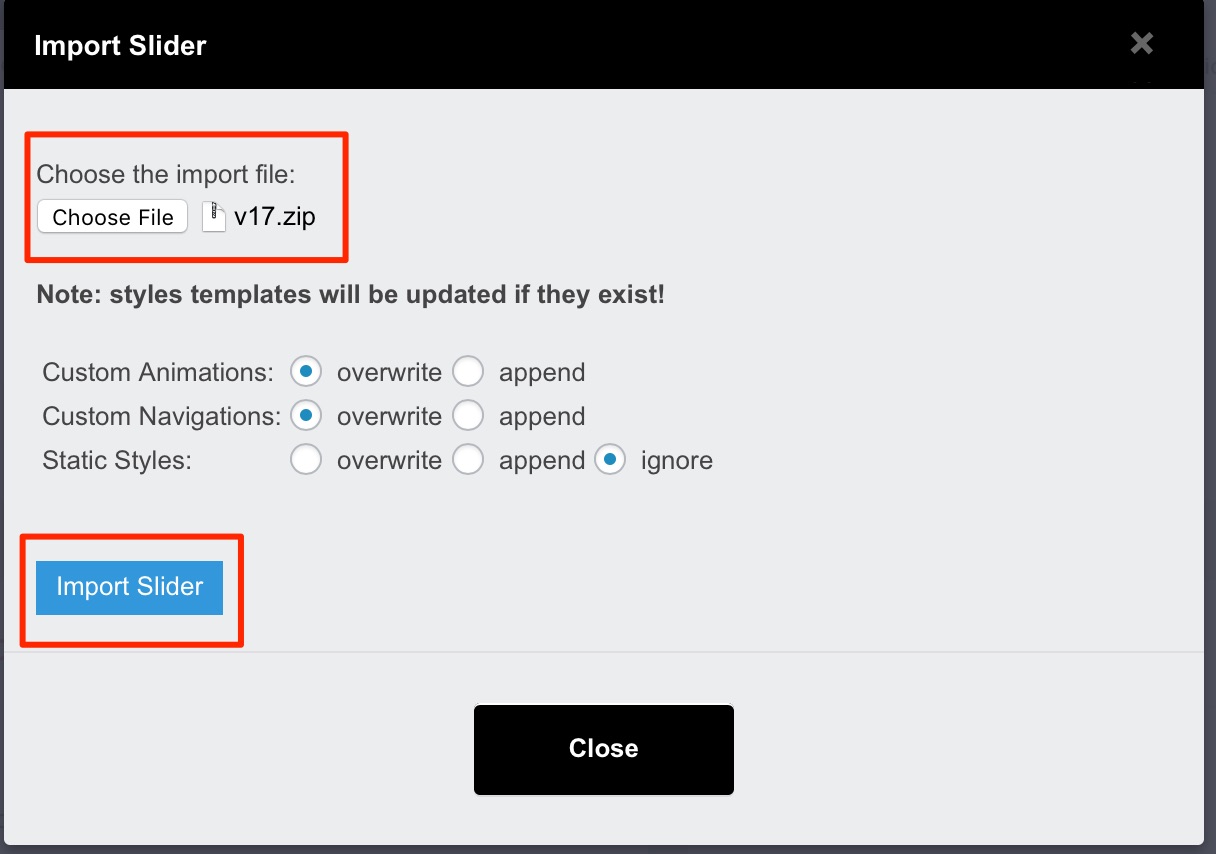
Click on Choose File and choose the .zip file. You can find the file from the theme package in the page SAMPLE CONTENT -> SLIDER CONTENT -> REVOLUTION SLIDER , choose the .zip file of the demo that you need. Click on Import.

You will see the slider begin listed under the Revolution Slider section which means that the slider was successfully imported. Click on Edit Slides to make any changes to the Slider.
Set up Main Navigation Menu : #
Once you have imported the content and settings, all the Menus would have been imported, and you just have to manually set the menu location. Follow the steps below to set up the menu in your site.
1
On your dashboard, go to APPEARANCES > MENUS.
2
Create your own menu or Select the Menu you need from the Drop Down. The menus that got imported with the demo sample data can be identified by the prefix. (Ex . V2 Main Menu).

3
Set Menu Location as Main Menu, by enabling the checkbox at the bottom of the page and Save the menu.

For the menu style used in V-17 demo , there are 2 Menu Locations used namely – Main Left Menu and Main Right Menu. You need to choose the Menu Links, and assign to each of these locations separately.
With this, the main menu will be set up and you are just one step away. More information about Menu Options in the theme can be found in another article here .
Set up Home and Blog pages : #
Once you have Imported the Contents, all the pages will be in place and you can choose the Home(landing) page and the Blog posts page. Follow the steps below to assign the pages –
1
On your dashboard go to SETTINGS > READING
2
In here, set the Front Page to your Home Page and Posts Page to your Blog Page.


